Nguồn: https://www.edureka.co/blog/interview-questions/java-interview-questions/ và https://congdongjava.com/forum/threads/java-thread-luồng-trong-java.714/
Cảm ơn 2 nguồn rất nhiều, thông tin rất rõ và bổ ích
Static là gì? Nếu để static thì sao mà non static thì sao? Trả lời: Static là 1 keyword của java để định nghĩa method hoặc variable có thể được truy cập sử dụng mà không cần tạo instance của Class. Vd: ta có thể sử dụng static method B của class A thông qua cách gọi A.B() mà ko cần tạo instance như “a = new A(); a.B();”
Hàm main trong 1 class là gì? Tại sao cần hàm main()? Trả lời: Hàm main là 1 hàm mặc định trong 1 class, hàm main này sẽ được JVM tìm và phát hiện ra để chạy ứng dụng. It is the method where the main execution occurs.
Tại sao Java không phải là 100% OOP? Trả lời: Bởi vì trong java có các kiểu dữ lieu nguyên thủy Boolean, long, string, int, … không phải là 1 object.
Constructor trong Java là gì? Trả lời: constructor là 1 block of code thường được xài để khởi tạo object, Constructor phải có tên giống với tên của class và không có kiểu trả về, nó được tự động gọi khi object được tạo. Có 2 kiểu constructor: default(constructor rỗng, ko có gì) và parameterized(khởi tạo có biến).
Singleton class là gì và làm thế nào để tạo 1 class singleton? Trả lời: Singleton là một trong nhưững design pattern đơn giản nhất, để đảm bảo trong 1 chương trình chỉ có 1 instance của 1 class được tạo. Singleton class có thể được tạo bang cách cho constructor private, và tạo 1 method public static getInstance() mà có thể access từ client đêể gọi và method này sẽ tạo instance nếu chưa khởi tạo và ngược lại. VD:
To include OpenCV libraries into Android Studio Project, its best to create a new Library Module in the project and port the files from OpenCV Android SDK bundle into it:
Create a new module by selecting File>New Module.
Select “Android Library”, and then enter the details:
Library name: OpenCV
Module name: opencv
Package name: org.opencv
Once the new module created, copy the contents of path_to_opencv_sdk/sdk/java/srcdirectory into path_to_your_project/opencv/src/main/java.
Under main, create the following directly path: aidl/org/opencv/engine and movemain/java/org/opencv/engine/OpenCVEngineInterface.aidl into it.
Copy the contents of path_to_opencv_sdk/sdk/java/res into path_to_your_project/opencv/src/main/res.
Create sdk folder inside path_to_your_project/opencv/src/ and copy path_to_opencv_sdk/sdk/native folder into it.
Within the opencv module, create CMakeLists.txt file and add the following lines in the following order:
Within the app (application module, could be another name) module, create/edit CMakeLists.txt file and add the following lines in the following order (Note the different path set to OpenCV_DIR):
Do a gradle sync, and now the OpenCV native libs, header files and Java wrapper classes are included.
When project is built and apk is launched, you could inspect the packaged apk under path_to_project/path_to_app_module/build/output/ (drag the apk onto the text editor tabs of Android Studio)
You should see a libopencv_java3.so under each abi architecture folder.
In the previous tutorial, you learnt about the file structure of OpenCV SDK for Android. Now, we will learn the packages which are available for us to use in OpenCV SDK for Android. At the end of this tutorial, you will definitely know what OpenCV for android has to offer.
In this tutorial, you will learn about the file structure of OpenCV SDK for Android. The information here is very short and lacks details. My purpose here is to provide just enough information to get going with the rest of the tutorials. I highly recommend reading more about the folders, algorithms, libraries and classes on your own.
A Beginner’s Guide to Setting up OpenCV Android Library on Android Studio
I recently started a project that involved working with OpenCV on Android. Most of the guides on setting up the library on Android were outdated or not complete. So, after getting multiple requests from team mates on how to set this up, I decided to just write a dead simple guide on this.
Go to the OpenCV Android Sourceforge page and download the latest OpenCV Android library. As at the time of writing this post, the latest available version was 3.4.1.
When the download completes, you should extract the contents of the zip file into a folder.
Step 2: Setup project
Create a new Android project using Android Studio only if you have not created one already for your computer vision project.
Note: Skip this step if you already have an Android project you want to use the OpenCV library in.
Step 3: Import OpenCV Module
After successfully creating an Android project, it is time to import the OpenCV module into your Android project. Click on File -> New -> Import Module…
It should bring up a popup like the image below where you can select the path to the module you want to import.
Browse to the folder where you extracted the OpenCV Android library zip file contents. Select the java folder inside of the sdk folder.
After selecting the correct path and clicking OK, you should get a screen like the image below.
Click on Next to go to the next screen. On the next screen (the image below) you should leave the default options checked and click on Finish to complete the module import.
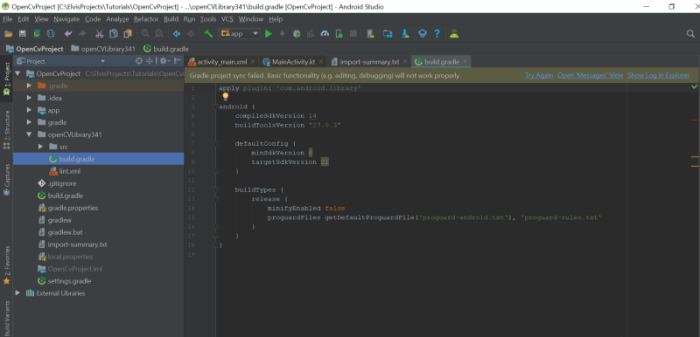
Step 4: Fixing Gradle Sync Errors
You should get a Gradle build error after you finish importing the OpenCV library. This happens because the library is using an old Android SDK that you probably don’t have installed yet.
To quickly fix this error, switch from the Android pane to the Project pane on the left side of Android Studio.
Browse to OpenCV library module and open its build.gradle file.
To fix the error, you just have to change the compileSdkVersion and targetSdkVersion to the latest Android SDK version or the one you have installed on your PC. After changing the version you should click on the syncbutton so that Gradle can sync the project.
Quick tip: buildToolsVersion can be ignored
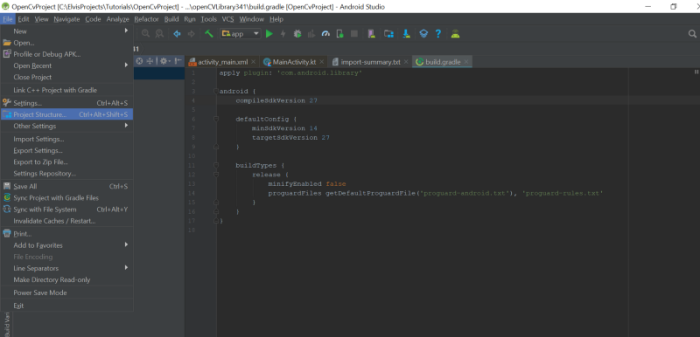
Step 5: Add the OpenCV Dependency
To work with the OpenCV Android library, you have to add it to your appmodule as a dependency. To easily do this on Android Studio, click on File -> Project Structure.
When the project structure dialog opens, click on the app module or any other module that you want to use OpenCV library in.
After navigating to the module, click on the Dependencies tab. You should see a green plus button on the far right of the dialog, click on it and select Module dependency.
When the choose modules dialog opens, select the OpenCV library module and click on OK.
When you return to the dependencies page, confirm that the module was actually added as a dependency then click on the OK button to continue.
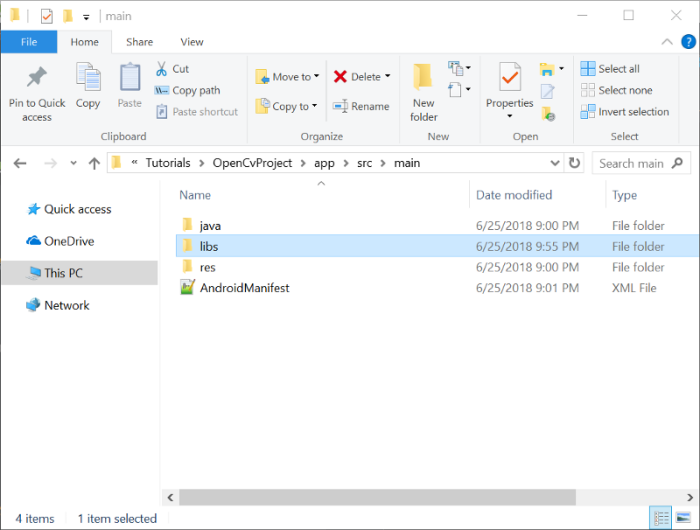
Step 6: Add Native Libraries
On your file explorer, navigate to the folder where you extracted the content of the OpenCV Android library zip file. Open the sdk folder and then the native folder (Use the image below as a guide).
Copy the libs folder in the native folder over to your project app module main folder (Usually ProjectName/app/src/main).
Rename the libs folder you just copied into your project to jniLibs.
Step 7: Add Required Permissions
To successfully use OpenCV, your app should have the camera permission added to its AndroidManifest.xml file.
Tip: Don’t forget to request for the camera permission at runtime on Android 6 and above.
Because you are bundling native libraries in your app APK, you will end up with a very large app APK size.
One way to solve this is to use ABI splits, so you only have the neccessary libraries needed for each device in an APK.
The other way around the size issue is to use the OpenCV Manager. In the folder where you extracted the library contents into, there is a folder called apk that contains the OpenCV manager for various architectures.
Select the APK with the right architecture of your test device and use ADB via command prompt/line to install it on your device.
Step 10: Test the App
Finally, hit the run button and run the app on your test device.
Note: Don’t forget to grant camera permission on Android 6 and above.
Selenium Webdriver is a powerful automation tool for testing web applications. It’s an open source library bundled with a rich set of features. Using it for testing a website is just like simulating the actions of a real user. All these abilities together make it a perfect tool for automation. But you need proper guidance to get the best out of it. In this blog post, we’ve assembled some of the best Selenium Webdriver coding tips for software testers.
Bạn đã từng tham dự những buổi phỏng vấn hết sức cam go và khi tưởng chừng như công việc đã gần trong tầm tay thì lại nhận được thư từ chối từ bộ phận tuyển dụng? Chắc hẳn nhiều người sẽ cảm thấy rất thất vọng, hụt hẫng, thậm chí là có cảm giác … giận vô cùng!
Nhưng có bao giờ bạn tạm gác qua những cảm xúc lẫn lộn của bản thân để một lần thử cảm ơn vì công ty đã thông báo việc từ chối nhận bạn vào làm?
Nghe chừng như vô lý quá, nhưng hãy thử suy xét một vài lý do sau để hiểu hơn vì sao bạn nên gửi lời cảm ơn đến bộ phận tuyển dụng sau khi phỏng vấn thất bại nhé.
Lời cảm ơn chính là cơ hội trong tương lai
Trước hết, hãy chấp nhận thực tế là bạn không có được công việc như kỳ vọng. Việc nuốt trôi cảm giác thất bại thật không dễ dàng gì và những gì bạn muốn làm là hét thật to, giải toả nỗi bực dọc với người đã phỏng vấn bạn vì quyết định của họ. Thế nhưng, hãy tìm đến những người bạn thân để giải bày tâm sự!
Còn với công ty đã từ chối mình, hãy gửi một email ngắn gọn để hồi đáp lại việc thông báo kết quả phỏng vấn. Vì một lý do nào đó mà bạn chưa thành công trong lần phỏng vấn này nhưng lời cảm ơn của bạn sẽ gây ấn tượng mạnh mẽ về sự chuyên nghiệp và nghiêm túc trong nghề nghiệp của bạn với nhà tuyển dụng. Và chắc bạn không ngờ tới, nhưng thái độ của bạn thông qua việc cảm ơn được đánh giá rất cao và hồ sơ của bạn sẽ có thể được âm thầm chuyển sang những vị trí khác phù hợp hơn trong mạng lưới hoặc các mối quan hệ quen biết của người tuyển dụng. Bạn đã nhìn thấy cơ hội của mình qua một việc rất nhỏ chưa?
Nhưng tôi thất bại rồi, phải nói những gì khi cảm ơn đây?
Bạn không cần phải giả vờ hồ hởi, tươi vui khi viết email cảm ơn vì sự thật hiển nhiên là bạn chưa thành công trong vị trí vừa phỏng vấn. Việc viết email với giọng văn quá tích cực lại khiến người nhận cảm thấy bạn chỉ đang cố gắng quá sức mà thôi. Hãy tỏ ra bình thường và gửi lời cảm ơn về những điều thực tế nhất như cảm ơn vì người tuyển dụng đã bỏ thời gian để phỏng vấn bạn, cảm ơn vì bạn đã có cơ hội được ghé thăm công ty và có thêm những thông tin thú vị xuyên suốt buổi phỏng vấn và cảm ơn vì bạn đã được thông báo kết quả đúng thời hạn để bạn không phải mất thời gian chờ đợi thêm và có thể tiếp tục tìm kiếm những cơ hội khác.
Và nếu bạn muốn giải toả thắc mắc vì sao mình chưa thành công cho vị trí vừa ứng tuyển, hãy nhân cơ hội này để đặt ra câu hỏi với bộ phận tuyển dụng. Bạn hoàn toàn có thể chủ động tìm hiểu xem “Có điều gì còn thiếu sót trong kinh nghiệm làm việc của tôi hoặc đâu là những điểm mà tôi chưa phù hợp cho vị trí ABC?” thông qua việc xin ý kiến từ công ty bạn đã tham dự phỏng vấn. Điều này vừa giúp cho bạn thôi băn khoăn vì sao bạn chưa trúng tuyển, đồng thời cũng cung cấp cho bạn góc nhìn khách quan từ vị trí nhà tuyển dụng để giúp bạn cải thiện thêm những kỹ năng và kinh nghiệm của mình trong tương lai.
Đừng quên việc giữ kết nối với nhà tuyển dụng
Việc bạn chưa thành công trong lần ứng tuyển này không có nghĩa là bạn sẽ không còn một cơ hội nào khác để tham gia công ty mà bạn yêu thích. Có rất nhiều lý do cả chủ quan lẫn khách quan để nhà tuyển dụng đưa ra quyết định sau cùng nhưng sẽ hoàn toàn không thừa nếu bạn tỏ thành ý giữ kết nối với họ bằng một câu nói đơn giản như “Hy vọng những kinh nghiệm và kỹ năng của tôi sẽ phù hợp với các vị trí khác trong thời gian sắp tới”. Theo chia sẻ của nhiều nhà tuyển dụng, việc chủ động bày tỏ lời đề nghị này từ ứng viên mang lại ấn tượng mạnh mẽ khiến họ nhớ đến những ứng viên này nhanh nhất khi phát sinh nhu cầu tuyển dụng mới có liên quan. Thậm chí, trong nhiều trường hợp, khi ứng viên xuất sắc hơn từ chối nhận việc vào phút cuối, nhà tuyển dụng ngay lập tức liên lạc lại với bạn để trao cho bạn cơ hội việc làm bạn vừa bỏ lỡ. Không phải vì không còn phương án nhân sự nào cho công ty đâu, chỉ vì nhà tuyển dụng thật sự đánh giá cao thái độ chuyên nghiệp và việc thể hiện bản thân đúng mực của bạn trong mọi trường hợp.
Hành trình đi tìm một công việc mơ ước có thể trải qua rất nhiều chặng đường, cả thuận lợi lẫn chông gai nhưng dù trong hoàn cảnh nào, CareerBuilder cũng xin chúc bạn luôn có cách cư xử đúng mực nhất để giữ được hình ảnh đẹp của bản thân trong mọi tình huống và hãy biết nói lời cảm ơn đến công ty “vì đã nói câu từ chối’.
When you need to config the environment to run selenium grid, your code run correctly but the browsers do not appear, you should review the following below:
1. use version stand alone 2.53 voi selenium 2.53
2. Latest Release: ChromeDriver 2.31. Supports Chrome v58-60 ok!
3. Ko Dùng port 4444 mà dùng port 9090
4. I found the solution in a bit of a convoluted way. The first step was
-. Changing the host file entry for the local host.
-. Removing the json dll from the Project References (don’t know if it has any bearing on the issue)
-. Set the IE security settings to the lowest.
-. In code, use the DesiredCapabilities.SetCapability(“ignoreProtectedModeSettings”) construct while instantiating the InterneyWebDriver object.